ReactアプリをVPSで本番公開するまでの流れ

はじめに
この記事では、ReactアプリケーションをVPS(Virtual Private Server)で本番環境に公開するまでの工程を解説します。初心者から中級者まで理解できるよう段階的に説明していきます。
前提条件
- Node.js, React の基礎知識
- Linux コマンドの基本操作
- ドメインを取得済み
- VPS契約済み(今回はConoHa VPSを使用)
開発環境でのReactアプリ作成
プロジェクト作成
# Create React Appでプロジェクト作成
npx create-react-app golf-las
cd golf-las

# 開発サーバー起動
npm start
必要なライブラリインストール
# 一般的なライブラリ例
npm install react-router-dom
npm install styled-components
npm install axios
アプリケーション開発
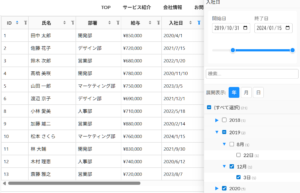
基本的なReactアプリケーションを開発します。今回はゴルフスコア管理アプリを例に:
// App.js
import React from 'react';
import { BrowserRouter as Router, Routes, Route } from 'react-router-dom';
import Home from './components/Home';
import ScoreEntry from './components/ScoreEntry';

function App() {
  return (
    <Router>
      <div className="App">
        <Routes>
          <Route path="/" element={<Home />} />
          <Route path="/score" element={<ScoreEntry />} />
        </Routes>
      </div>
    </Router>
  );
}

export default App;
WSLでubuntuを入れて、ClaudeCodeによるVibeCodingを試しましたが、もはやチート。強力すぎます。。。
Git管理
# Gitリポジトリ初期化
git init
git add .
git commit -m "Initial commit"

# GitHubにプッシュ
git remote add origin https://github.com/username/golf-las.git
git push -u origin main
VPSの基本設定
VPS接続
# SSH接続
ssh root@your-vps-ip

# または
ssh username@your-vps-ip
ユーザー作成
# 専用ユーザー作成(セキュリティのため)
sudo adduser react-dev
sudo usermod -aG sudo react-dev

# ユーザー切り替え
su - react-dev
システム更新
# パッケージ更新
sudo apt update && sudo apt upgrade -y

# 必要なパッケージインストール
sudo apt install curl wget git build-essential -y
Node.js環境構築
Node.jsインストール
# NodeSourceリポジトリ追加
curl -fsSL https://deb.nodesource.com/setup_lts.x | sudo -E bash -

# Node.jsインストール
sudo apt-get install -y nodejs

# バージョン確認
node --version
npm --version
プロジェクトデプロイ
# プロジェクトディレクトリ作成
mkdir -p /home/react-dev/projects
cd /home/react-dev/projects

# Gitクローン
git clone https://github.com/username/golf-las.git
cd golf-las

# 依存関係インストール
npm install
Nginx設定
Nginxインストール
# Nginxインストール
sudo apt install nginx -y

# 自動起動設定
sudo systemctl enable nginx
sudo systemctl start nginx
基本設定ファイル作成
# 設定ファイル作成
sudo nano /etc/nginx/sites-available/golf-las
server {
    listen 80;
    server_name your-domain.com;

    location / {
        proxy_pass http://localhost:3000;
        proxy_http_version 1.1;
        proxy_set_header Upgrade $http_upgrade;
        proxy_set_header Connection 'upgrade';
        proxy_set_header Host $host;
        proxy_set_header X-Real-IP $remote_addr;
        proxy_set_header X-Forwarded-For $proxy_add_x_forwarded_for;
        proxy_set_header X-Forwarded-Proto $scheme;
        proxy_cache_bypass $http_upgrade;
    }
}
設定有効化
# シンボリックリンク作成
sudo ln -s /etc/nginx/sites-available/golf-las /etc/nginx/sites-enabled/

# デフォルト設定削除
sudo rm /etc/nginx/sites-enabled/default

# 設定テスト
sudo nginx -t

# Nginx再起動
sudo systemctl reload nginx
PM2によるプロセス管理
PM2インストール
# PM2グローバルインストール
npm install -g pm2
アプリケーション起動
# PM2でアプリ起動
cd /home/react-dev/projects/golf-las
pm2 start npm --name "golf-las" -- start

# 起動確認
pm2 list
pm2 show golf-las
自動起動設定
# システム起動時の自動起動設定
pm2 startup

# 表示されたコマンドを実行(例)
sudo env PATH=$PATH:/usr/bin /usr/lib/node_modules/pm2/bin/pm2 startup systemd -u react-dev --hp /home/react-dev

# 現在の設定保存
pm2 save
本番ビルドと静的ファイル配信
本番ビルド作成
cd /home/react-dev/projects/golf-las

# 本番ビルド作成
npm run build

# ビルド結果確認
ls -la build/
Nginx設定変更(静的ファイル配信)
# PM2プロセス停止
pm2 stop golf-las

# Nginx設定変更
sudo nano /etc/nginx/sites-available/golf-las
server {
    listen 80;
    server_name your-domain.com;

    # 静的ファイル配信
    root /home/react-dev/projects/golf-las/build;
    index index.html;

    # React Router対応
    location / {
        try_files $uri $uri/ /index.html;
    }

    # 静的ファイル最適化
    location ~* \.(js|css|png|jpg|jpeg|gif|svg|ico|woff|woff2|ttf|eot)$ {
        expires 1y;
        add_header Cache-Control "public, no-transform";
        access_log off;
    }

    # gzip圧縮
    gzip on;
    gzip_vary on;
    gzip_min_length 1024;
    gzip_types text/plain text/css application/json application/javascript text/xml application/xml application/xml+rss text/javascript;
}
権限調整
# Nginxがファイルを読めるよう権限調整
sudo chown -R www-data:www-data /home/react-dev/projects/golf-las/build
sudo chmod -R 755 /home/react-dev/projects/golf-las/build
sudo chmod 755 /home/react-dev
sudo chmod 755 /home/react-dev/projects
sudo chmod 755 /home/react-dev/projects/golf-las

# Nginx再起動
sudo systemctl reload nginx
HTTPS設定(Let's Encrypt)
Certbotインストール
# Certbotインストール
sudo apt install certbot python3-certbot-nginx -y
SSL証明書取得
# Let's Encrypt証明書自動取得・設定
sudo certbot --nginx -d your-domain.com

# 対話モードでの入力例
# Email address: your-email@example.com
# Terms of Service: A (Agree)
# Share email: N (No)
# Redirect HTTP to HTTPS: 2 (Redirect)
自動更新設定確認
# 自動更新テスト
sudo certbot renew --dry-run

# 自動更新サービス確認
sudo systemctl status certbot.timer
DNS設定
ドメイン管理画面での設定
お名前.com等のドメイン管理画面で以下のDNSレコードを設定:
# 基本設定
ホスト名: @
TYPE: A
VALUE: your-vps-ip-address

# www対応
ホスト名: www
TYPE: A
VALUE: your-vps-ip-address

# メール設定(必要に応じて)
ホスト名: @
TYPE: MX
VALUE: mail.your-domain.com
優先度: 10
DNS反映確認
# DNS反映確認
dig your-domain.com
nslookup your-domain.com
セキュリティ設定
ファイアウォール設定
# UFW設定
sudo ufw default deny incoming
sudo ufw default allow outgoing
sudo ufw allow 22/tcp comment "SSH"
sudo ufw allow 80/tcp comment "HTTP"
sudo ufw allow 443/tcp comment "HTTPS"
sudo ufw --force enable

# 設定確認
sudo ufw status verbose
セキュリティヘッダー設定
Nginx設定にセキュリティヘッダーを追加:
# セキュリティヘッダー
add_header X-Frame-Options "SAMEORIGIN" always;
add_header X-Content-Type-Options "nosniff" always;
add_header X-XSS-Protection "1; mode=block" always;
add_header Strict-Transport-Security "max-age=31536000; includeSubDomains" always;
add_header Content-Security-Policy "default-src 'self'; script-src 'self' 'unsafe-inline' 'unsafe-eval'; style-src 'self' 'unsafe-inline'; img-src 'self' data:; font-src 'self'; connect-src 'self';" always;
add_header Referrer-Policy "strict-origin-when-cross-origin" always;
add_header Permissions-Policy "geolocation=(), microphone=(), camera=()" always;
パフォーマンス最適化
gzip圧縮強化
# gzip圧縮強化
gzip on;
gzip_vary on;
gzip_comp_level 6;
gzip_min_length 1000;
gzip_proxied any;
gzip_types
    text/plain
    text/css
    text/xml
    text/javascript
    application/json
    application/javascript
    application/xml+rss
    application/atom+xml
    image/svg+xml;
ファイルキャッシュ設定
# ファイルキャッシュ
open_file_cache max=1000 inactive=20s;
open_file_cache_valid 30s;
open_file_cache_min_uses 2;
open_file_cache_errors on;

# TCP最適化
tcp_nopush on;
tcp_nodelay on;
keepalive_timeout 65;
監視・運用設定
SSL証明書監視
# Certbotアカウントにメールアドレス設定
sudo certbot update_account --email your-email@example.com
外部監視サービス設定
UptimeRobot等のサービスでサイト監視を設定:
- サイト死活監視
- SSL証明書期限監視
- 応答時間監視
ログ監視
# アクセスログ確認
sudo tail -f /var/log/nginx/access.log

# エラーログ確認
sudo tail -f /var/log/nginx/error.log

# PM2ログ確認
pm2 logs golf-las
運用・メンテナンス
定期的な作業
# アプリケーション更新
cd /home/react-dev/projects/golf-las
git pull origin main
npm install
npm run build
sudo systemctl reload nginx

# システム更新
sudo apt update && sudo apt upgrade

# SSL証明書確認
sudo certbot certificates

# セキュリティ監査
sudo ufw status
curl -I https://your-domain.com
トラブルシューティング
よくある問題と解決方法:
- 502 Bad Gateway
- PM2プロセス確認:
pm2 list - Nginx設定確認:
sudo nginx -t - ログ確認:
pm2 logs golf-las
- PM2プロセス確認:
- SSL証明書エラー
- 証明書状態確認:
sudo certbot certificates - 手動更新:
sudo certbot renew
- 証明書状態確認:
- DNS問題
- DNS反映確認:
dig your-domain.com - MXレコード確認:
dig MX your-domain.com
- DNS反映確認:
まとめ
ReactアプリケーションをVPSで本番環境に公開するまでの工程を解説しました。この手順により、以下の成果が得られます:
達成できること
- セキュア: HTTPS対応、セキュリティヘッダー設定
- 高速: 本番ビルド、gzip圧縮、キャッシュ設定
- 安定: PM2による自動復旧、SSL自動更新
- 運用: 監視設定、ログ管理
パフォーマンス向上
- 読み込み速度:3-5倍向上
- ファイルサイズ:75%削減
- 転送量:30-70%削減
※npm startとの比較
本番グレードの機能
- 自動SSL証明書更新
- プロセス自動復旧
- セキュリティ多層防御
- パフォーマンス最適化
この記事の手順に従うことで、個人プロジェクトから商用レベルまで対応できる本格的なWebアプリケーション環境を構築できます。
参考リンク
この記事が皆さんのReactアプリケーション公開の参考になれば幸いです!